UnCrackable-Level3.apk
照常,安装并打开,被检测到了root,通过magisk进行root权限的隐藏。
之后还是输入正确的密码。
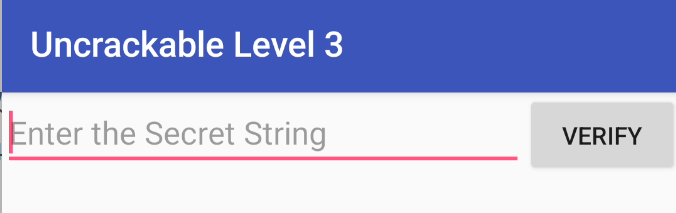
在输入错误的Secret后,会提示Nope…That’s not it. Try again.
在Jeb中搜索这个字符串,发现关键点在check_code上。
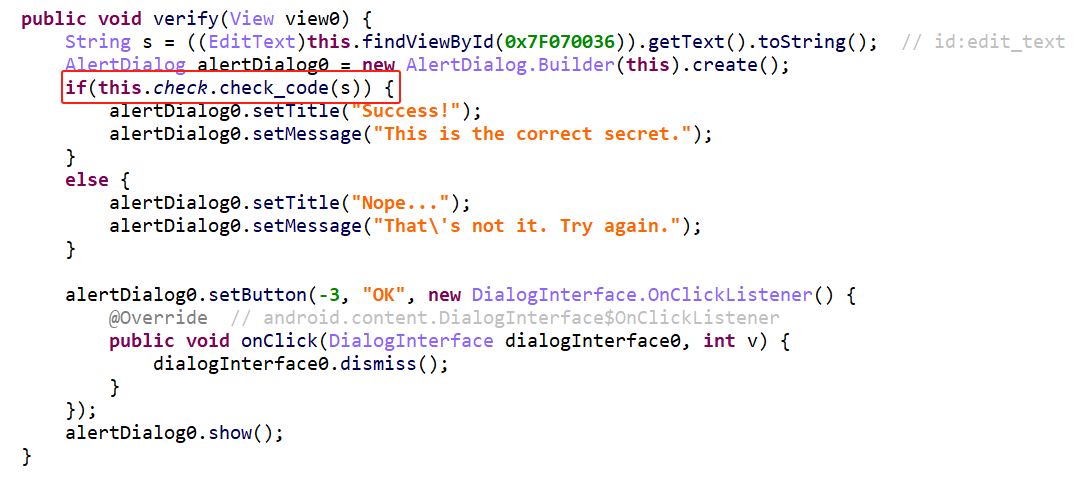
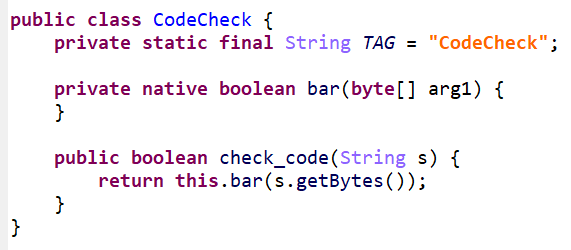
check_code调用了native层函数bar。
在ida中,检索函数bar,一个很明显的xor解密,密钥的长度为24。
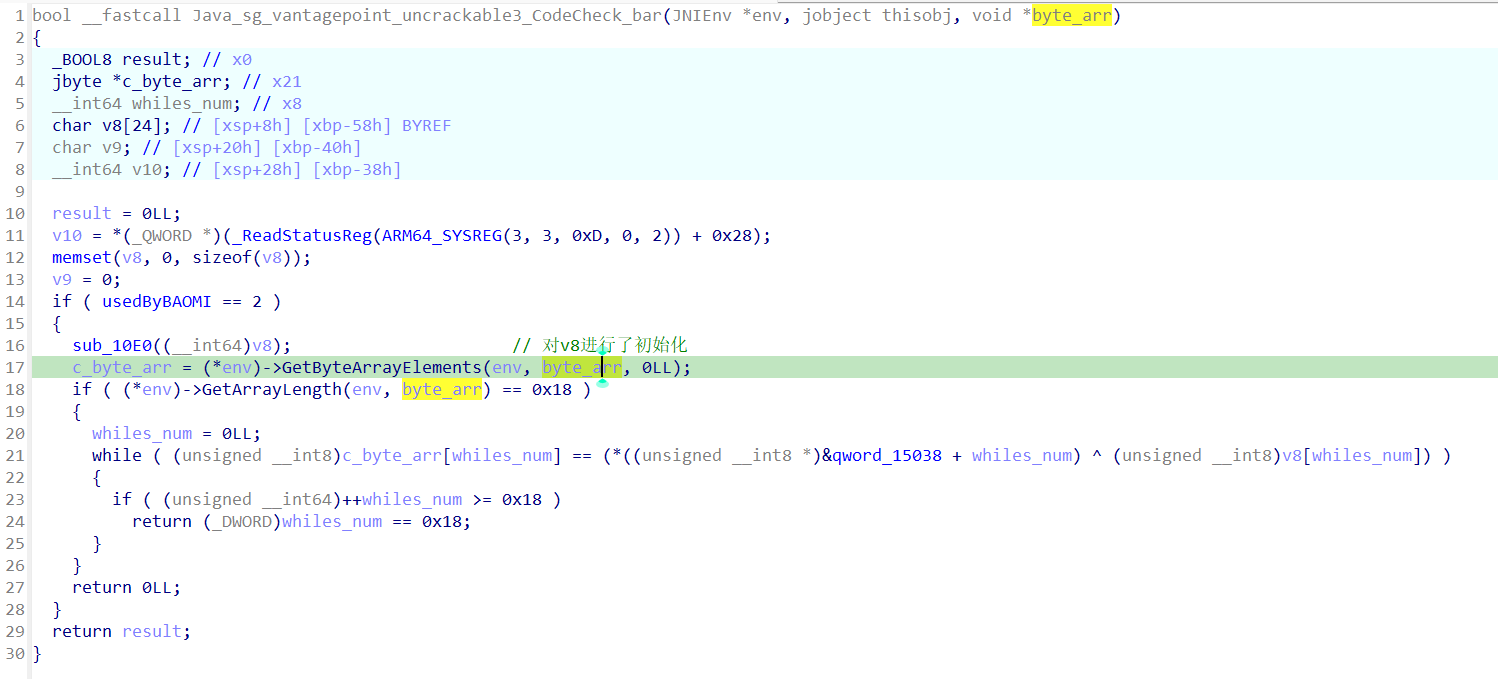
为了获得正确的secret,需要将v8和qword_15038进行xor运算,得到最终的结果。
不难看出,v8的值来自于sub_10E0,这里考虑对sub_10E0进行hook,然后查看v8的值。
结果hook的过程遇到了反frida的检测,可以根据报错的调用栈定位到goodbye函数。
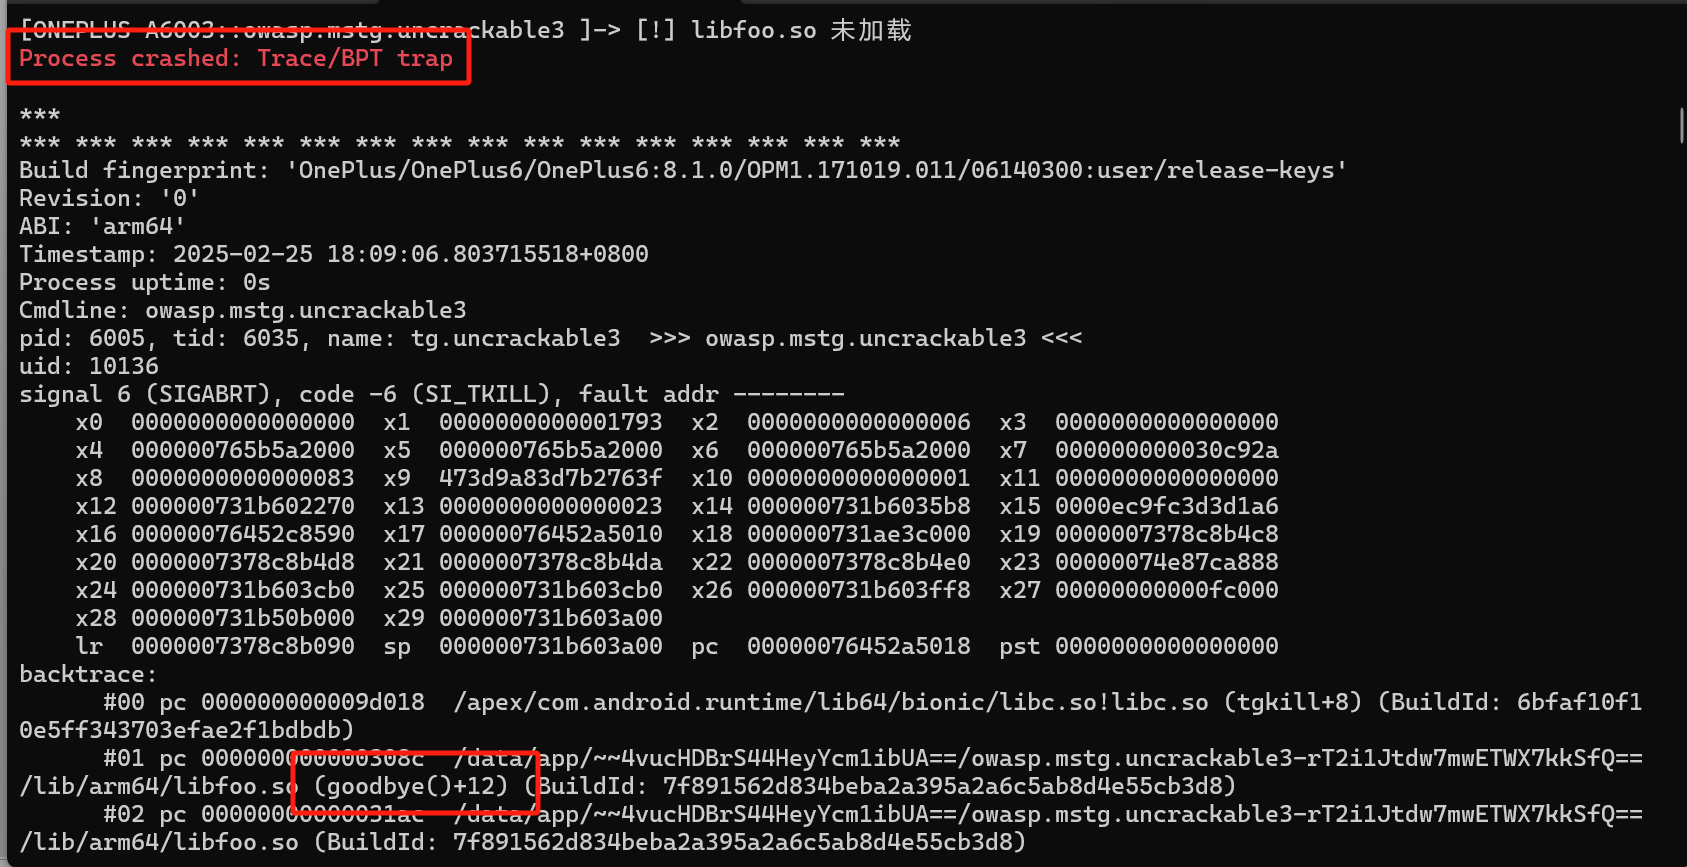
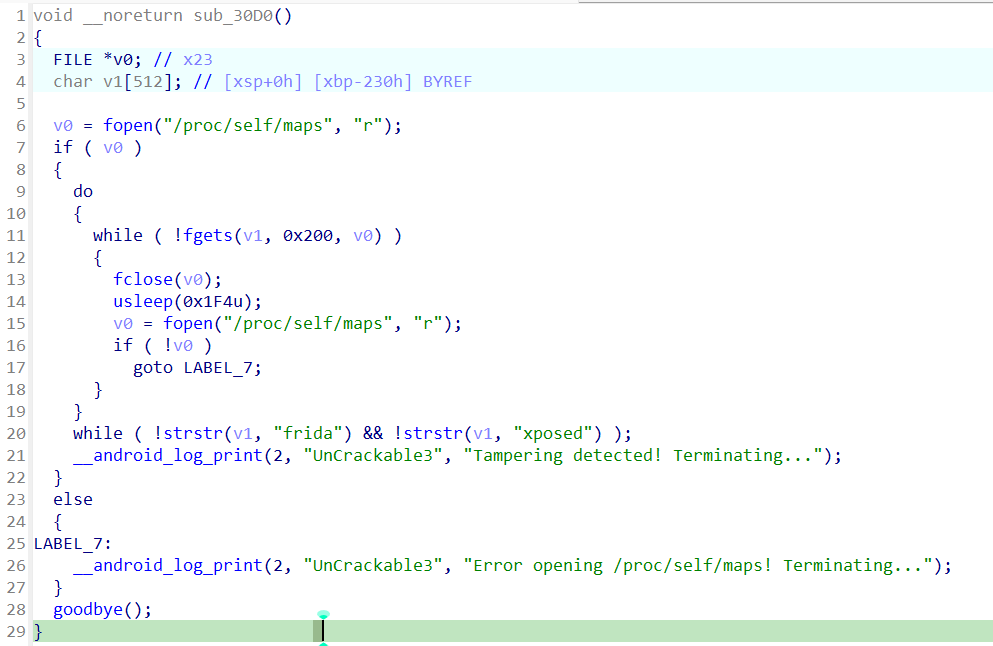
追溯到源头,发现在sub_30D0处,调用了goodbye(),检测的逻辑是,通过读取映射到内存的文件名,只要发现frida等字段就退出。
为了能够正常使用frida进行hook,有以下几种hook的方式,绕过反frida。
1.hook函数sub_30D0。
2.hook函数strstr。
Ⅰ.先讲hook sub_30D0:观察过函数sub_30D0,发现它被写在了.init_array节里,这个节里面的函数,会在库加载的时候依次被调用,因此,如果想要hook这个函数,必须在System.loadLibray执行过程中——因为执行完后,frida就hook不了了;而若是还没执行,libfoo.so还没加载,当然hook不了。
查阅了相关博客,so层的.init_array节里的函数,都是被模块linker64中的call_array调用的,所以要hook函数call_array,当下的核心目标是获得call_array在模块linker64中的偏移量。(方法随意,可以直接在ida中进行查看)
在hook后,流程变成:遇到加载的so是libfoo.so,在完成了内存映射后,call_array还没有执行,这个时候去修改内存中sub_30D0的内容,之后正常执行call_array。
1
2
3
4
5
6
7
8
9
10
11
12
13
14
15
16
17
|
var linker64_module = Module.getBaseAddress("linker64");
Interceptor.attach(linker64_module.add(0x20764),{
onEnter:function(args) {
if(args[0].readCString().match("libfoo.so")) {
var libfoo_module = Module.findBaseAddress('libfoo.so');
console.log("获取libfoo.so的基地址==>"+libfoo_module)
Interceptor.replace(libfoo_module.add(0x30D0),new NativeCallback(function(){
return;
},'void',[]));
}
},onLeave:function(result){}
})
|
Ⅱ.hook strstr就比较简单,判断strstr的第1个参数里有没有frida字段,如果有,之后的返回值直接强制返回。
1
2
3
4
5
6
7
8
9
10
11
12
13
14
15
16
17
18
19
20
21
22
23
24
25
26
27
28
|
Interceptor.attach(Module.findExportByName("libc.so", "strstr"), {
onEnter: function(args) {
this.haystack = args[0];
this.needle = args[1];
this.frida = false;
try {
const haystack = this.haystack.isNull() ? "" : this.haystack.readCString();
if (haystack && (haystack.includes("frida") || haystack.includes("xposed"))) {
this.frida = true;
}
} catch (e) {
console.log("读取字符串失败:", e);
}
},
onLeave: function(retval) {
if (this.frida) {
retval.replace(0);
}
return retval;
}
});
|
ok,在解决了反frida后,继续对之前提到的sub_10E0进行解密,由于这个函数没有返回值,可以判断:这个函数会在v8所指向的地址处,修改24个字节。
1
2
3
4
5
6
7
8
9
10
11
12
13
14
15
16
| function hookXor(){
Interceptor.attach((Module.findBaseAddress("libfoo.so")).add("0x010E0"), {
onEnter: function(args){
console.log("onEnter: hook xor key");
this.key = args[0];
},
onLeave: function(retval){
var key_ = new NativePointer(this.key);
var arr = key_.readByteArray(24);
console.log(arr);
}
});
}
setTimeout(hookXor, 1000);
|
这里为了避免hookXor未执行,特意延迟了1000ms再进行注入(方法比较简单)。
还有其它方法,在保证加载了libfoo.so后立马进行hook,而不用等待1000ms。(同样是在加载器上做文章,不过这里hook的是System.loadLibrary)
1
2
3
4
5
6
7
8
9
10
11
12
13
14
15
16
17
18
19
20
21
22
23
24
25
26
27
28
29
30
31
| Java.perform(function() {
const System = Java.use("java.lang.System");
const Runtime = Java.use("java.lang.Runtime");
const SystemLoad_2 = System.loadLibrary.overload("java.lang.String");
const VMStack = Java.use("dalvik.system.VMStack");
SystemLoad_2.implementation = function(library) {
console.log("Loading dynamic library => " + library);
try {
const loaded = Runtime.getRuntime().loadLibrary0( VMStack.getCallingClassLoader(), library);
if(library.includes("foo")) {
Interceptor.attach(Module.findBaseAddress("libfoo.so").add('0x00000fa0'),{
onEnter: function(args){
console.log("getting other_key value");
this.other_key_address = args[0];
},
onLeave: function(retval){
var other_key = new NativePointer(this.other_key_address);
var arr = other_key.readByteArray(24);
console.log(arr);
}
});
}
return loaded;
} catch(ex) {
console.log(ex);
console.log(ex.stack);
}
};
});
|
最后得到的结果如下,即:1d 08 11 13…

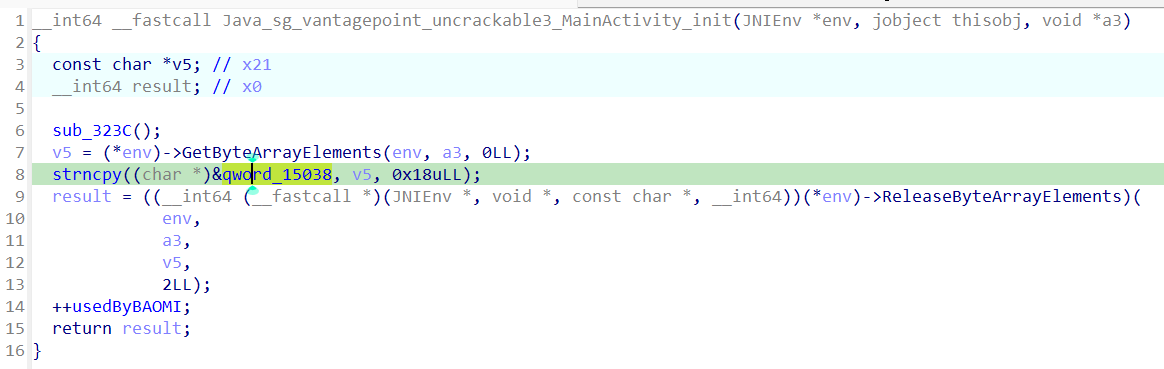
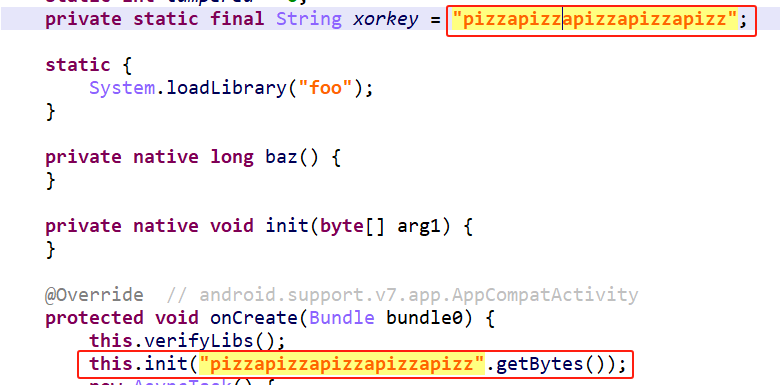
同时,另一个密钥key是qword_15038,追踪后,发现是通过init函数进行初始化的,这个函数是一个jni函数,根据代码,可以发现它的值由java层传递。
因此,另一个key的值是pizzapizzapizzapizzapizz。
将两者做异或运算。
1
2
3
4
5
6
7
8
9
10
11
12
13
14
15
16
17
18
19
20
21
22
23
24
25
26
27
28
29
30
31
32
33
34
35
36
37
38
| def xor_bytes(str1, bytes2):
"""
对两个24字节的数据进行逐字节的异或运算。
参数:
str1: 长度为24字节的字符串
bytes2: 长度为24字节的字节数组
返回:
result: 异或运算后的字节数组
"""
if len(str1) != 24 or len(bytes2) != 24:
raise ValueError("输入必须是24字节长")
bytes1 = str1.encode('utf-8')
result = bytearray()
for b1, b2 in zip(bytes1, bytes2):
result.append(b1 ^ b2)
return result
if __name__ == "__main__":
str_input = "pizzapizzapizzapizzapizz"
bytes_input = bytes([0x1d, 0x08, 0x11, 0x13, 0x0f, 0x17, 0x49, 0x15, 0x0d, 0x00, 0x03, 0x19, 0x5a, 0x1d, 0x13, 0x15, 0x08, 0x0e, 0x5a, 0x00, 0x17, 0x08, 0x13, 0x14])
result = xor_bytes(str_input, bytes_input)
print("异或运算结果:", result)
print("十六进制表示:", result.hex())
|

阿这,这个解密出来的结果有点6。
